
Surface texture: Using horizontal and vertical lines to simulate natural tooth appearance
Theory and technical procedure of lines
Giuseppe Romeo, Italy
Introduction
The surfaces of a tooth are always conditioned by the surfaces of the adjacent teeth. A smooth tooth close to a tooth with a more pronounced texture will create a contrast of predominance in which the rougher tooth will appear of lower value than the smoother tooth. The texture of the surface is an integral optical property of ceramic material and has fundamental value in enhancing the aesthetic appearance of prosthetic restorations created with the material. Form therefore contains the function, colour and surface of the ceramic material.
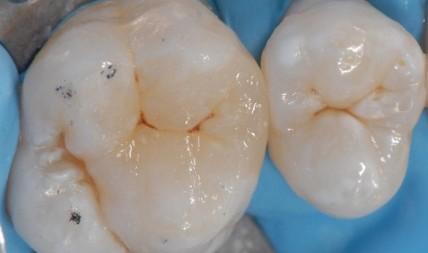
The brightness, roughness and quality of the marks applied to the surface of a tooth affect the refraction of light, which can change according to the arrangement of these characteristics. Weaving lines that traverse the surface of a tooth do not all have the same direction (Fig. 1). They are horizontal, vertical and oblique; sometimes one can have a combination of these characteristics that enhance the vestibular aspect. A tooth that has the same vestibular configuration but that has different weaving lines on the surface is continually changing in aesthetic appearance (Fig. 2).
This demonstrates the importance of the manner in which the texture is performed and this feature manually smoothed after glazing of the ceramic in order to obtain a suitable texture for the aesthetic restoration to be performed. Texture can be created with thicker and more subtle marks: the combination of these thicknesses allows for a variable texture result on the entire surface of the tooth (Figs. 3–5).
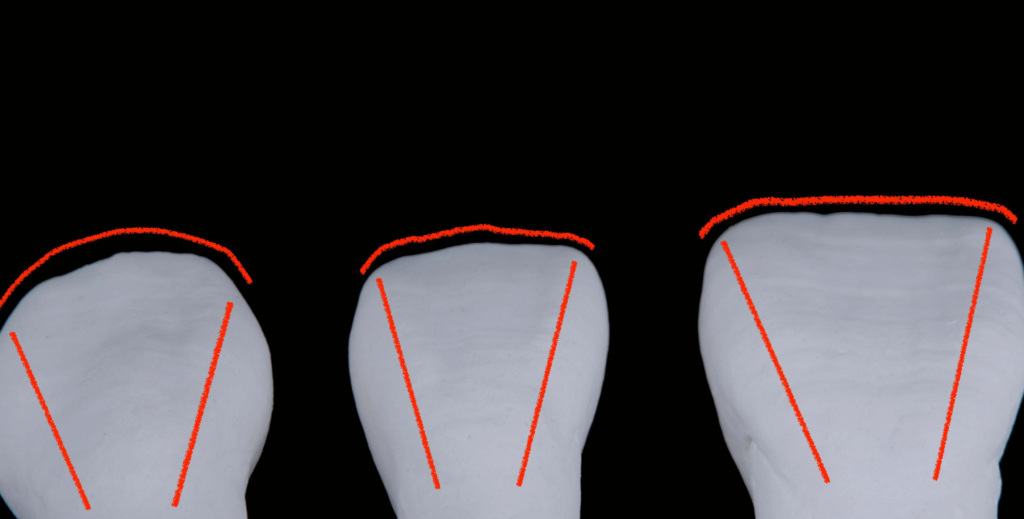
Based on the design of the weaving lines, the illusion of different tooth appearance in size can be created. The extended vertical lines simulate length; the short ones highlight width of the unit. These lines can be very close together or have wider distances between them, changing the appearance of the tooth in a visual illusion (Figs. 6 & 7).
Horizontal lines simulate progressive variation of distance, whereas oblique lines change the perspective effect of the tooth. Dots on the surface of the tooth create a static effect, and wavy and short vertical lines produce a dynamic visual effect. In the case of a circumferential design, the horizontal line is deeper on the cervical third of the tooth and smoother on the incisal area (Figs. 8–12).
Having considered the various theories of marks on the tooth surface, let us turn our attention to the technical execution. With a laboratory handpiece at low speed, the vertical lines are the first to be performed on the surface of the tooth with a conical bur and then the horizontal lines nare immediately delineated with a sintered cylindrical drill. In the next step, the surface of the tooth is marked with an inverted conical bur, making single horizontal lines with a certain distance between them. Other thinner lines are then made on the facial surface with a high-speed piece to create contrast. Subsequently, the entire area of interest is worked first with a glass-paper cone and then with a sectioned rubber wheel to obtain a concave and convex facial surface that lends naturalness to the restoration. After these steps, the ceramic teeth are ready to be glazed and then polished manually to achieve the desired texture to simulate a natural appearance (Figs. 13–23).
All the restoration margins are worked under the stereomicroscope to achieve a precision outcome in order to create a restoration that retains its aesthetics and function long term. The veneers during the adaptation procedure are fitted using a red paste on the master die, finding suitable contact points on the intaglio surface. This allows a better-stabilised position of the veneers once they are seated in the mouth. Furthermore, this marginal precision and veneer stabilisation make it easier for the clinician to quickly nd the correct position of the restoration in the mouth with no tilt (Figs. 24–26).
Internal texture
The internal texture is created after the first firing of the ceramic unit. The first step of this procedure is realised with a brush during the ceramic layering procedure. Several horizontal and vertical lines with some irregular areas are designed and created on the facial surface of the tooth. The ceramic unit at this point is ready for the first firing, and once the ceramic has been baked, other lines and superficial details are made using a bur to emphasise the quality of the internal texture.
Internal texture has an appearance different from that of external texture. The combination of these two different quality and design textures will allow dynamic refraction and reflection of light when it penetrates the ceramic material. This technique imparts a more natural appearance to the ceramic restoration (Figs. 27–31).
Discussion
Surface texture can improve the appearance of general morphology through the orientation of its characteristics. Vertically and horizontally oriented lines applied to the surface can determine different width details and appearance of tooth size. Both vertical and horizontal lines applied in combination will improve the appearance of the general tooth anatomy by creating a dynamic texture.
Gold or the silver powder facilitates identification of natural superficial characteristics and subsequent mimicking of the surface texture. The combination of internal and external surface texture design directly affects light re ection, refraction and transmission. Acknowledgements The author would like to thank Dr Domenico Massironi, Dr Alessandro Conti and Dr Erik Jan Muts for their clinical performance.
 Рис. 1: Направления светового луча явления преломления и отражения.


Комментарии могут оставлять только зарегистрированные пользователи.
Регистрация